

Check first whether your business already has a listing, because that decides everything else. If it has none, you add one, enter accurate details and complete the verification Google offers. The order matters more than the speed.
The profile is free, and Google charges no registration fee. If you pay an agency to help, you are paying for the help.
This guide is for a business that has no profile yet, with one location or a business that travels to its customers. If a listing already exists, claiming an existing business is the right guide instead, and verification has its own. For everything after setup, from reviews to performance reports, read the complete guide to Google Business Profile setup and management.
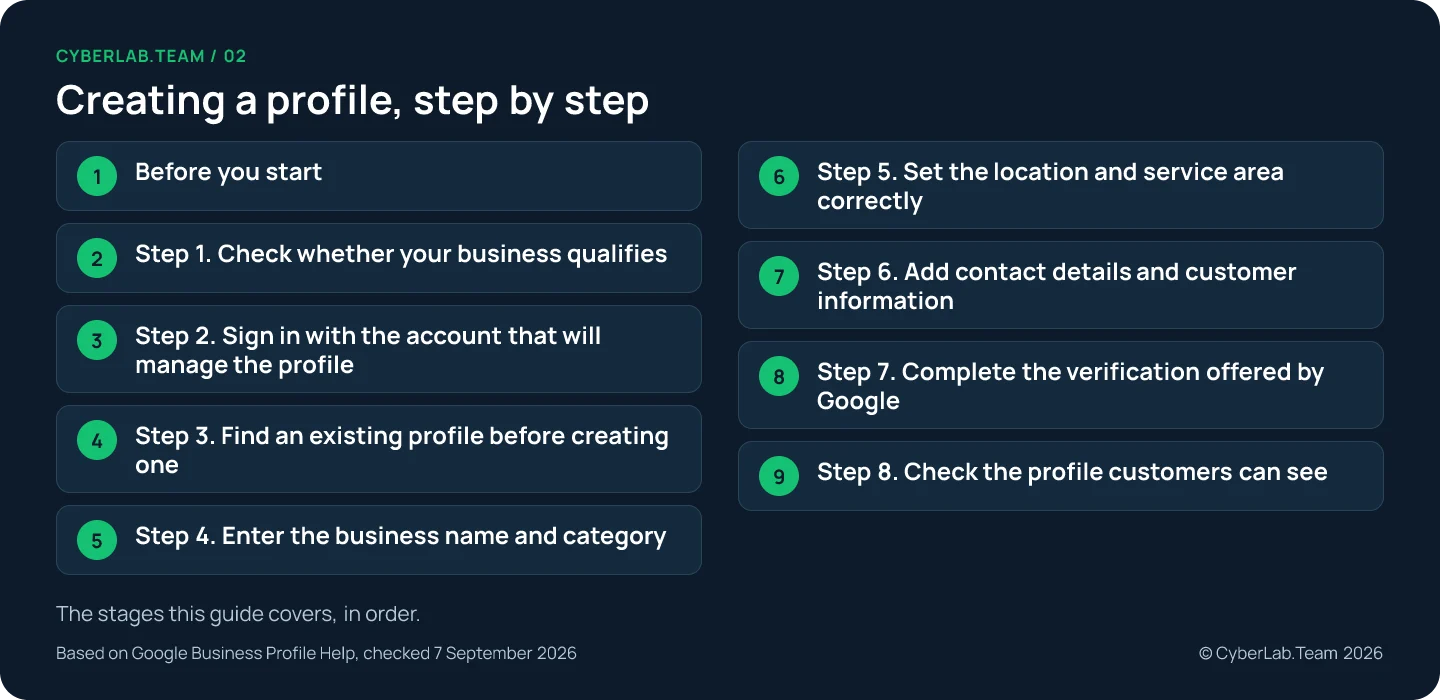
Before you start
The one decision that changes your answers later is how you serve customers. Take two businesses. A plumber works from a home office and drives to customers, and nobody visits the house. A hair salon has a street unit with a sign and customers who walk in. In Step 5 the plumber chooses the service-area setup, hides the home address and lists the districts the van covers, up to 20. The salon shows its address and adds no service area, because customers come to it. The phone number, hours and description in Step 6 look the same for both; the location answers are what differ. These two are illustrations, not clients. Decide which one you resemble before you open Google.
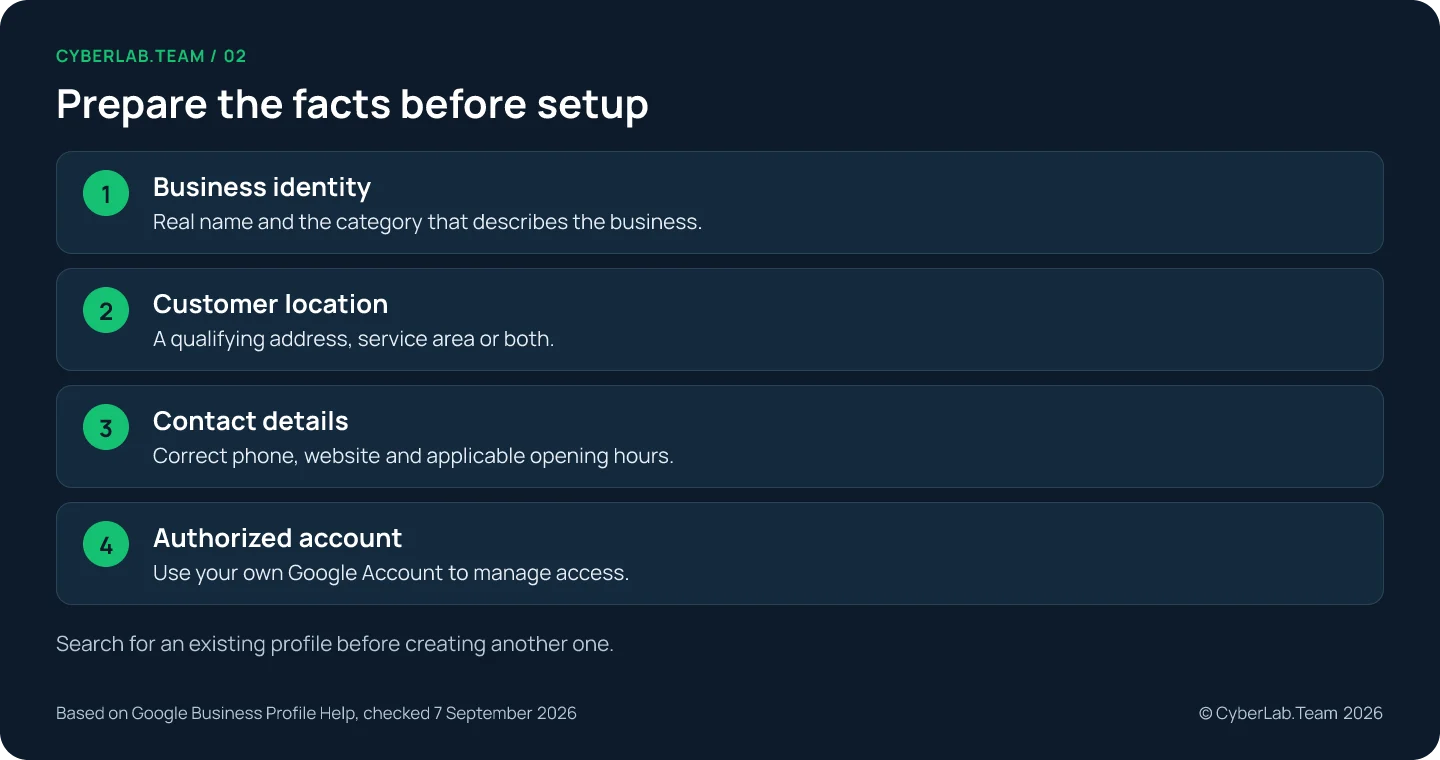
Keep the facts in one document: the name as it appears on your signs and website, the address or service area, the contact details and the hours customers can actually use. Google will ask you to confirm fields one by one, and you will want something to check the finished profile against.
Decide who will own the profile. If an agency helps, the business must keep ownership or co-ownership. Google’s own setup guidance recommends making the business owner the profile owner and giving the agency a manager role.
Step 1. Check whether your business qualifies
For the businesses this guide covers, eligibility means meeting customers in person during your stated hours, at your premises or at theirs. An online-only business with no in-person service does not qualify. A mailing address you rent but do not work from does not count as a location, and some business models follow their own rules.
Seasonal businesses, kiosks and delivery-only food services are among the models with specific exceptions. Check the eligibility rules for your model before applying the ordinary storefront process to it.
A coworking office can qualify, but only with clear signage, customer access during business hours and staffing by your own team. A desk you rent by the hour with nobody there to receive a customer will not pass.
Confirm that Business Profile is supported where the business operates. The supported-country list has exceptions for some territories, so a country name alone does not settle every location’s eligibility.
Step 2. Sign in with the account that will manage the profile
The profile belongs to a Google Account, so pick that account deliberately. An existing one works, and a new one does not need a Gmail address: Google lets you create an account with an email address you already use. Record which account owns the business, because that is the one you will need every time you come back.
If you have several accounts, the wrong one will cost you time later. When you return to manage the profile, Google will ask you to sign in to the account associated with it, and nothing else will show the listing.
Add recovery information and turn on 2-Step Verification before you go further. Then give each colleague their own profile access instead of sharing the account password.
Step 3. Find an existing profile before creating one
Search Google Maps for the business name and city before you create anything, and check the address and business identity, especially when another company has a similar name. What you find gives three outcomes.
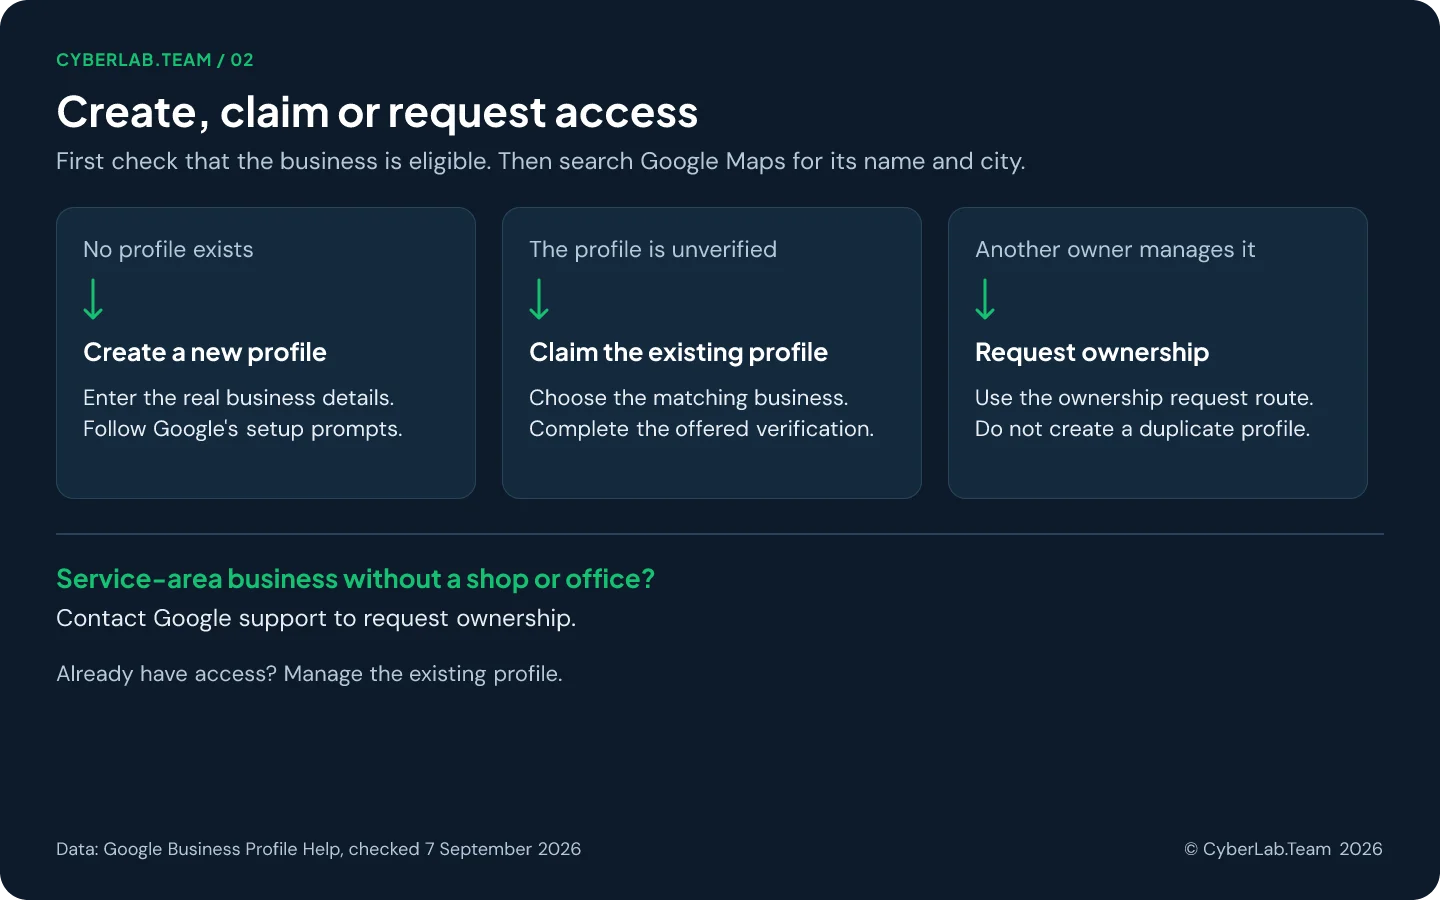
- No profile exists. Go to business.google.com/add, select Add your business to Google and enter the details requested on screen. Continue with Step 4.
- An unverified profile exists. Claim it instead of adding a second one for the same business. The route is in how to claim an existing business.
- Someone else has verified it. You request ownership, and the current owner has 3 days to respond. The same guide covers the request, its outcomes and the separate route for a service-area business without a shop or office.
A move to a new address is a reason to update your existing profile, not to start over. Google says not to create a replacement listing just because the business relocated.
Step 4. Enter the business name and category
The name field identifies the business and the category tells Google what it does. Use the name customers know from your real-world branding and the most specific primary category that fits. Keep additional services, opening hours and promotional phrases out of the name unless they genuinely form part of the business name under Google’s rules.
If the precise category does not exist, choose a broader accurate option; you cannot create a custom category. Additional categories describe other parts of the business, and you do not need one for every product or service. A later category change may trigger another verification request, so make the first choice carefully.
Step 5. Set the location and service area correctly
Google offers three location setups, and the right one follows from how you serve customers: at your address, at theirs, or both. Pick the model first, then fill in the fields it needs. This is the step where the plumber and the salon from the start of this guide give different answers.
| Business model | Public address | Service area |
|---|---|---|
| Storefront | Show the qualifying customer location | Not needed for a business serving only at its premises |
| Service-area business | Hide the address if customers are not served there | Add the areas you actually visit or deliver to |
| Hybrid business | Show the qualifying customer location | Add the areas you also visit or deliver to |
For a storefront, enter the complete address, including the relevant building or suite details. Check that the map pin points to the actual location. If Google cannot locate the address correctly, adjust the pin.
If you work from home and only visit customers, keep the home address hidden from the public profile. Hiding it does not remove Google’s need to confirm where the business operates during verification.
Select service areas by city, postal code or another supported area. Google allows up to 20 areas and does not let you define them as a radius. Choose the places you actually serve.
Do not create a separate profile for each service offered by the same business. Google provides a services field for those offerings where it is available.
Step 6. Add contact details and customer information
This is the longest step, and the one customers judge you on. Some fields unlock only after verification, so you may need to come back.
In Edit profile, the Contact section lets you select the country and enter the phone number. Use a number the business controls and that reaches it directly. If you have a website, add its full URL, including https:// or http://, and open the link before saving to check that the destination represents this business and shows the correct contact information.
Set the regular hours when customers can use the business. If you close for a break, enter separate opening periods for the day. Use Special hours for holidays or other brief changes instead of rewriting the ordinary week. A business that operates only by appointment should not publish ordinary opening hours under Google’s guidelines; the hours editor has an Open with no main hours option for that case.
Write a description of what the business does and what a customer needs to know. Keep it within 750 characters, without URLs or HTML, and avoid concentrating on sales, prices or promotions. If Google offers an AI-generated description, check every detail before using it: Google itself warns that the feature creates creative text and needs an accuracy review, and availability varies by region and language.
Where available, add the services you actually offer and accurate attributes such as payment or accessibility information. These options depend on the business category and location, and some attributes come from customer input.
You may be able to enter some information before verification, while other profiles require verification first. Return to Edit profile afterward to finish the fields available to your business.
Step 7. Complete the verification offered by Google
Google decides which verification methods your profile gets, so follow the options shown on your own screen; it may ask for more than one. If you request a mailed code, leave the name, address and category alone while you wait, because changing them invalidates it. Everything else, including the video rules, how long review and delivery take and what to do after a rejection, is in the verification guide.
Step 8. Check the profile customers can see
Verification is not the finish line; the public listing is. Search for the business by name and city on Search and Maps and compare what appears with your working document.
Add clear, well-lit photos that represent the real business. For a storefront, include the exterior so visitors can recognize it, and choose relevant interior or work photos as well. Public photos and videos require a verified profile.
Review the status of saved edits. Google distinguishes Accepted, Pending and Not approved, and saving a change does not mean the new information is already visible to customers.
To invite help, open Business Profile settings, then People and access. Add the person’s email and choose the appropriate role. Managers can handle daily updates but cannot add or remove users or remove the profile.
Verification confirms your authority to manage the business. It does not guarantee a particular search position; local ranking also depends on relevance, distance and prominence.
Creating a profile without a public address
If you serve customers at their location and do not receive them at yours, register as a service-area business. Google may still ask for an address during setup and verification; it is not shown on the public profile. Hide it and add the areas you serve; Step 5 above has the fields and the 20-area limit.
The rule is about where you meet customers, not where your desk is. A plumber who works from a spare room and always drives to the client should keep the home address off the public profile. A hybrid business that also receives customers at its own address may show it and add service areas on top.
Because a real address is still required, some shortcuts do not work. A P.O. box or a mailbox at a remote location is not acceptable. A rented mailing address or a virtual office where nobody from your business works is not eligible. A coworking space qualifies only with clear signage, customers received there during business hours and your own staff present.
Three questions before you set up
Do I need a website?
A separate website is not a universal requirement. Google’s guidelines allow a phone number that connects to the business location or a website that represents it. Complete the contact fields that apply to your business.
Can I register the profile before opening day?
An eligible business can set a future opening date up to one year ahead. After the date is entered and the business is verified, Google says the profile appears 90 days before opening. Use the actual planned date.
Can I create a Google Business Profile without an address?
Yes, as a service-area business. You enter an address during setup for verification, then hide it and list the cities or postal codes you serve. The section “Creating a profile without a public address” above explains what Google accepts and what it does not.
If registration is where you are stuck, the Google Business Profile setup service covers it. Send us the business name, the city and whether customers come to you, you go to them, or both, through the contact page, and say which step refused to complete.
Sources
Google Help pages cited in this guide, checked 7 September 2026.
- Add or claim your Business Profile: https://support.google.com/business/answer/2911778
- Business eligibility and ownership guidelines: https://support.google.com/business/answer/13763036
- Guidelines for representing your business on Google: https://support.google.com/business/answer/3038177
- Request ownership of a Business Profile: https://support.google.com/business/answer/4566671
- Resolve duplicate profiles and ownership issues: https://support.google.com/business/answer/12756178
- Manage your business category: https://support.google.com/business/answer/7249669
- Manage your business address: https://support.google.com/business/answer/2853879
- Manage your service areas for service-area and hybrid businesses: https://support.google.com/business/answer/9157481
- Verify your business on Google: https://support.google.com/business/answer/7107242
- Edit your business hours: https://support.google.com/business/answer/15300403
- How to set Special hours: https://support.google.com/business/answer/6303076
- Manage your Business Profile description: https://support.google.com/business/answer/13682007
- Edit your Business Profile: https://support.google.com/business/answer/3039617
- Add your phone number: https://support.google.com/business/answer/16750496
- Add your business website: https://support.google.com/business/answer/16749279
- Manage your services on your Business Profile: https://support.google.com/business/answer/9455399
- Manage your business attributes: https://support.google.com/business/answer/9049526
- Add a business opening date: https://support.google.com/business/answer/9174409
- Manage your Business Profile photos and videos: https://support.google.com/business/answer/6103862
- Understand what happens to your Business Profile edits: https://support.google.com/business/answer/3038311
- Manage your Business Profile owners and managers: https://support.google.com/business/answer/3403100
- Business Profile third-party policies: https://support.google.com/business/answer/7353941
- Supported countries and regions: https://support.google.com/business/answer/6270107
- Create a Google Account: https://support.google.com/accounts/answer/27441
- Tips to improve your local ranking on Google: https://support.google.com/business/answer/7091